Saturday, August 24, 2013

Cat Treat, pocket tissue case and cards

Here's my latest square for a WOCS quilt.  This one has a cat theme and I picked out "Cat Treat" from The Trilogy since it looked so cute.  Kind of boring to stitch with large one-color blocks, but not so large over-all.  

Bonnie, one of the main quilters for WOCS recently completed her 100'th quilt for the organization!  Can you believe it?  I was very proud to have one of my squares used on that quilt, the ladybug I stitched a while ago.   Here's a photo of the quilt with my square on the left in the middle row.  Bonnie wanted to do something special for quilt 100 and I think she came up with a great idea.

In addition to quilts, WOCS members make all kinds of little accessories to give out to seniors and children in need.  Most are decorated with x-stitch designs, but  not all.  I was searching around for instructions for pocket pack tissue cases, mostly to see the finished dimensions, when I came across a super-cute version that looked easy to make.  I couldn't resist giving it a try to see if I could really make one that looked like the model.  Sure enough, this was really easy, looks like it actually has a quilt type binding even though it doesn't, fits the tissue pack and is a great way to use up fabric scraps.

Click here for the tute.


Labor Day weekend is my cousin's wedding and I made a little card to go with the wedding gift.  I had a bit of déjà vue while stitching it.  I think I stitched this design once before, but I have no photo of it and can't really remember the occasion.  Anyway, it was cute enough to stitch twice.  It didn't have suggested colors so even if this is my second stitch, it probably has a different color palette from the first.  The design is  "Basket of Flowers" from Appleseed Prim.  You can get the freebie here

Knocked out a quick birthday card to use a little later in the year.  I was searching for something else and discovered this little piece of stitching, so I thought I'd put it to good use.  This is a section of "de Tout Coeur" from Les Chalets de Perelles.  You can get the freebie here.  Hearts and champagne should go together well for a birthday celebration.

Sunday, August 4, 2013

Cellphone Case and Traveling Pattern Winner

The winner of the Lizzie Kate "Wear a Smile" pattern and, hence, the next in line to stitch the traveling pattern is Angi at My Happy Memories.  If you haven't checked out Angi's blog, take a look.  She does some lovely crafting  including free original cross-stitch designs for you to stitch.  Angi, please send me your snail mail address so I send the pattern to you.

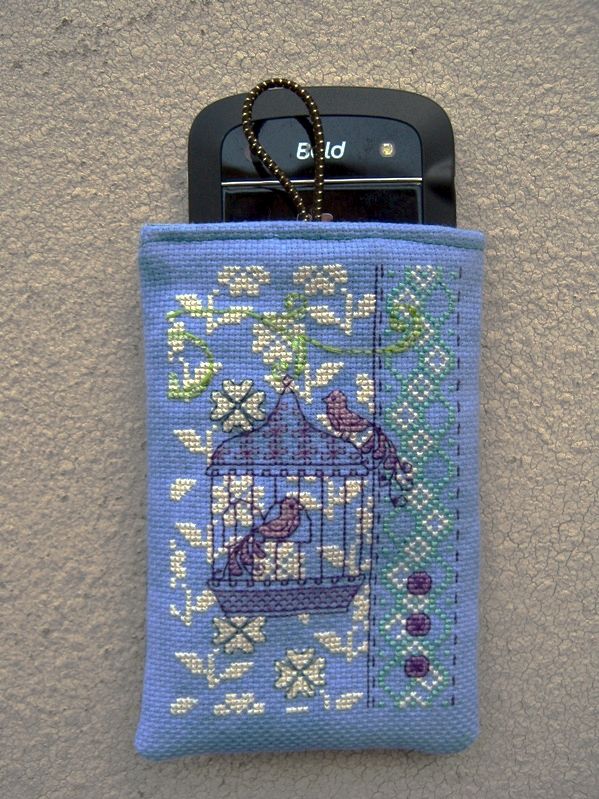
I spied these cute birdcase designs in my freebie collection while searching for something else completely.  I thought I'd make a birthday card from one of them, but after I stitched it up, I thought it was too pretty for just a card.  I had seen a tutorial with a slightly different method for sewing up a pouch from the way I usually do it and I wanted to try it out.  Plus I wanted to try a different closure.  The design was a perfect size for a cell phone pouch, so the project plans were set. 

The stitching is on 18 count hand dyed Aida from Sassy.  The floss colors have been modified since the contrast was not to my liking when I used this blue fabric with the suggested colors.   I used cotton batting and the piece is lined with no exposed raw edges.  The closure loop is made from a hair elastic, and I found a reasonably sized button in my button jar.  Makes a nice padded case for those who carry the phone and don't want it to get damaged.  Probably not ideal for those who are glued to the screen at all times.  Fits my Blackberry Bold nicely so I hope it fits whatever cell phone the recipient of this gift uses.

You can download the free patterns for the birdcage cards at the Making Spot.
The tutorial for the pouch can be found here at Elizabeth's Whimsies.


Sunday, July 28, 2013

Wear a smile, have some coffee, and think Cinderella

I think I just did the fastest complete cross stitch project of my life.   Mii Stitch chose me as the next in line to stitch Lizzie Kate's "Wear a Smile" in another of the traveling patterns that's making the rounds.  Such a cutie when I saw it, but I probably would never have thought to stitch something like this otherwise.  I received the pattern on Friday, stitched almost the whole thing on Friday night, and finished it up into a pinkeep on Saturday.  I'm planning to display it on a little easel and give it to my dentist as a little knick-knack for the office.  The office seems to thrive on such things.  It's stitched on 36 ct HDF linen over 2 threads in the 3 shades of DMC on the pattern.

I need to pick a stitcher who would like to stitch this pattern next.  Please leave a note in a comment that you would like to be included in a drawing and I'll pick a name.   As always with traveling patterns, we would like you to stitch it in a timely fashion, show it on your blog, and offer to send the pattern on to another stitcher.


Does everyone's dentist send out such arty re-call notices as mine does?  Take a look at the latest one I received:


I stitched up another Aliolka pattern to make as a gift for a coffee loving friend.  I was going to do a book mark, but then I thought about a quilty coaster.  Not 100% happy with my finish, but the more I look at it, the more I like it.  Not sure if this is on linen or evenweave.. just used an available scrap.

You can find the free chart here.


I crocheted this cute princess motif from a Japanese designer.  I think of her as Cinderella, but maybe with that hair she's more of Princess Leia.   This was a very difficult graphical crochet pattern to interpret.  I finally found a number of people who tried it on Ravelry and several gave a variation to make it work out.  So I used one of those and still had trouble.  She's not perfect, but who is?  I got the idea to make a pumpkin zippered pouch from one I had seen on the web and applique the princess on the back., So I think of it as Cinderella waiting for the pumpkin to turn into a coach so she can proceed to the ball.  Did not quite turn out the way I imagined it, but I am proud to say that I figured out how to do it with no exposed raw edges inside!     I'll probably donate her to WOCS to use as one of the favors they give to nursing home residents or even to the children in one of the shelters for domestic violence.


Tuesday, July 9, 2013

Rose Bag and Reindeer Buddy II

When you use these cross-body sling bags that I make,  surprise... they wear out eventually.   No problem.. just means I get to make more.   I had stitched this beautiful red rose from Passione Ricamo with the intention of piecing it with other fabrics and making something completely different.  But it sat for way too long waiting for a finish, so I just whipped up a romantic little bag with it.   I added a bit of crocheted lace, the first two rows of the  Celestial Edging pattern.  Then I threaded a piece of hand-dyed silk ribbon through it from a grab bag of ribbons I once bought from Vikki at HDF.  The cord is purchased.  The piece is lined with no raw edges showing inside.  I took the photos before I added a snap closure.  I have a wedding to go to later in the summer, so I think this will be perfect to use then.

The pattern is called 'A Rose For You' and you  can download it  here.
There are lots of other beautiful freebies on the page as well.


The Aliolka reindeer were just to cute to stitch only one.  Here's a companion ornament to the one I made earlier.    Another fork bow, this one with 2 loops and a bit larger.  I made it on a wide-toothed comb that I use to get the tangles out of my hair.  You can find the pattern here.   The trim on this one is actually a round spiral braid made exactly like a gimp lanyard.  This was a little thicker than my last one, but I still think I could have added another 6-strand length of floss to each of the 4 lengths used for braiding. 


Just for fun I tried a little sample of 3-strand braiding and the 4-strand round braid using 4 lengths of floss.  The 4-strand one on the bottom in the photo below is the same as the braid on the ornament, but by placing the lengths in a different order, you get a spiral effect instead of a diamond effect.

If you want to try it, here's an explanation:  Four-strand spiral braid tute 
I think I like that thickness and I'll try it out next time.  Uses a lot of floss, but floss is the cheapest supply. 

Edited July 11, 2013:  Here's a link to a You Tube video that demonstrates the four-strand braiding technique very clearly:      Four-strand spiral braid video


Saturday, June 22, 2013

Reindeer buddy, crocheted pouch & dapper chick

After having success with the pinkeep finish,  I decided to start experimenting with the flat ornament finish that is pretty similar.   The design is a freebie from Aliolka's blog.   I changed the colors to make a little more contrast on the fabric I was using, Sassy's cobblestone on 18 ct Aida.  The edging is a standard braid with three lengths of floss.  I used two six-strand lengths of each color.  I  think I could have used more strands to be a little fuller.  Next time I might try a lanyard-sytle braid like we used to make out of gimp when I was a kid.  I don't know if they still do that, but I made a ton of those back in the day.   Not 100% happy with the finish, but my brother who likes cute reindeer and owls should like it.  I think I may do one of the other reindeer ornaments on the blog as a companion piece since I have one small piece of the same fabric left.

Here's the tutorial that I more or less followed:
Flat Ornament Finishing Tute


The fun part was the little bow.  I don't know if I'm the last person to discover the 'fork bow' or not, but it's an incredibly simple way to make a nice bow for this purpose.  This little one was made with a regular dinner fork.  To make a larger bow, you use a larger fork or a potato masher or a wide-toothed comb.. anything with evenly spaced spikes that you can use for weaving the ribbon.  You can make multiple loops too.  Use the link below to see how to do it.
Fork Bow Tute


Found another crochet motif I wanted to try.  This is called the Tahiti Blossom.  Click on it for the pattern.  I used it to embellish a little pouch and then I wanted to do some embellishment on the flap also.  Found this fan pattern on Ravelry.  Ravelry patterns are great because members give so many review, hints and cool modifications.  The picot edging is one of those great ideas that really adds to the original pattern.  I sent this to Melanie with one of the little pincushions I showed in an earlier post.   I guess I could say I sent it because she was going through a tough period, but I actually didn't know that.  In any case, it turned out to be a good time to send her a little pick-me-up gift.

Tahiti Blossom


WOCS started a special request quilt with a chicken theme.  Seemed uninteresting to me, but then I remembered something from my stitch and stow vault.  This little guy was stitched in the 80's or early 90's  from a design in an old issue of Cross Stitch and Country Crafts.  I think it was an adaptation of a vintage Easter card.  I kept hoping someone I knew would have a baby around Easter time and I would use this as the basis of a baby sampler, but it never happened.  I'm happy to donate it now and give it a good home.

Monday, June 10, 2013

Feeding again

My last post seems to have gotten lost in  the world of RSS and never made it to many readers.  Trying this way to see if I can at least get a way to broadcast.  The link should take you directly to the post   Charming Ghost and Summer Splendor


Sunday, June 9, 2013

Charming Ghost and Summer Splendor

We have a tale of two seasons today.  Ever since Maja of Snowflower Diaries entered the blogging and designing world, I've been wanting to stitch this little haunted house cutie.  And now I also want to make everything into a pinkeep too since I had success with the last one.  As you can see, I'm into experimental mode with the top bow.  Couldn't get the colors to show up right with my camera of course.  The fabric is a 36 ct linen in Rue Green which a really light blue-green shade although it looks very blue here.  The last photo is probably the closest to the real color. The dark color floss is Sassy's Fabbys Witches Brew.  I had some in my stash and thought this was the perfect use for it.  I just love that dreamy little ghost, right down to the eyelashes.. teeny straight stitches.  And the dark stems and leaves just add to the eerie quality of the little piece.  I used Comic Book cardboard for the inside of this one.  Felt like Penny in the Big Bang Theory Comic Book store when I went to shop for this.  Or more like Penny's adopted grandmother, but whatever.  The board is a bit sturdier than the Brownie Mix cardboard, but both work equally well for this I think.


And now back to our current season.  I saw this LHN Summer Splendor design on so many blogs that I grew attached to it.  Stitched it up as a little wall-hanging or mat. The border is not as wonky as it appears in the photo.  I used DMC floss with just a few minor changes in the colors. I wanted a little more contrast in the greens, and I picked a gold that showed up a bit better.  This is on 28 count Summer Khaki linen over-two... easy on the old eyes.


Monday, May 27, 2013

Dutch Tulip Luggage Tag & Crocheted Pincushions

Sometimes, a design grabs me because it is the perfect size for something I want to make.  That was the case with this Dutch Tulip design from Threadworks Primitives.  I saved the chart some time ago, earmarking it for a luggage tag.  I also saved the photo of Anne's rendition because I liked her modified color scheme.  She used hand-dyed floss, but I tried to come close to the look using DMC colors.. 356, 407, 433, 758 if you are interested.  I'm pretty happy with finish on a linen scrap I had.  I think the backing fabric and eyelet were good accompaniments as well.


While everyone else is showing their orts once a month as part of the TUSAL,  I just accumulate mine to be used for pin cushion stuffing.  The bag was full and my periodic urge to crochet some thread motifs kicked at the same time so I made three little mini-cushions.  Each is only 2-2.5".  They work up really fast and will make nice stitchy gifts. 

The first is from Margaret Hubert's Granny Square Book. This is called the  Dogwood Flower Granny Square.  It's  a perfect design for this type of pin cushion.  I think I picked it because the model was crocheted and blocked so perfectly.  I aspire to that kind of perfection, but I settle for much less.


The next two are both from various Japanese designs I've found on the web and saved.  They are presented as graphs with little text hints.  Of course, text in Japanese doesn't help me, but usually I can pretty much get along with the graph only.  Like reading sheet music and not understanding any Italian.


The round ones are a little harder to do, but not much.   


Three little cuties together:


Wednesday, May 8, 2013

Fond of Dancing and Spring House

I guess I'm in a pink state of mind for spring now.  My latest two pieces are smothered in pink.  The first is a small design I stitched to be given to a bride along with a wedding gift.  It's the Jane Austen ornament designed by The Sampler Girl from the JCS 2012 ornament issue.  The bride-to-be has spent much of her life dancing, so this design was so appropriate.   It seemed to cry out to be a pinkeep, but the last time I tried making one of those, it was not one of my proudest stitching moments.  Since that time, I've found lots of tutorials with various tips, so I gave it another shot. I'm so glad I did, because I really love the outcome.  I replaced the gold dress from the original design with a pink one. The "J" and "A" for Jane Austen, became "J" and "S", the first initials of the bride and groom.   This is a tiny piece done over-one on 28 count  Summer Khaki linen.  The couple lives in a New York City apartment....no space for a lot of extraneous knick-knacks.  I think I'll package it with one of those mini-wooden easels so it can easily be displayed on a desktop.  I'm sure that pinkeeps are a total mystery to non-stitchers and the easel will make it clear that it is for display!

Love the 180° turnout!


The backing fabric is one of my favorites.  This print has come in handy on a number of my finishes so you may recognize it (and perhaps are tired of seeing it!)

Continuing in my pink theme, I  signed up to do a house design for a WOCS quilt square.  There are so many cute house designs around, but when I started searching, nothing really grabbed my attention.  Then one cute freebie stood out from the rest, and I'm sure the color scheme is what really got to me.  I also love the use of 'white space' in this design to delineate the sections of the house.  This is done over-two on 25-count bone Lugana...quite a change from the over-one pinkeep. I like both results equally.  The photo makes the fabric look white, but it is more cream-colored in real life.

The design, "Printemps",  is from the blog "Le Tric et le Croc, et la Brod d'Isazabelle".  If you are interested, you can download the PDF chart here.