Monday, October 14, 2013

Fall, Halloween, Winter

A few assorted finishes to show today.  I finished one more cell phone case for WOCS.  This is based on a digi-stamp, 'Happy Harvest' by Doodle Garden.  Tried a different way to do the closure just using a fabric loop.  I think I like it better than elastic actually.


While I was packing up my finishes to send to WOCS, I remembered a little tea wallet I knitted some time ago, so I sent that too.  Nobody needs a special pouch to hold their teabags, but the pattern was too cute to pass up.   The free pattern is right here.


Next I finished a classic Mary Garry Halloween design.  I think I'll send it to a friend who has a brand new grand-daughter.  First Halloween ornmanent!  I was trying to do a crocheted border in black, but my eyes said no way.  So I substituted star sequins with beads and a running stitch. This is on 36 count linen.

I needed (needed?) and extra Halloween card, so this little Prairie Schooler witch filled the bill for a quick stitch.  I had planned to get more elaborate in the finishing, but I always seem to run out of steam for that when it comes time to actually do it.


Inside, I have the cutest vintage printable.  You can download it here.

And cold weather holidays will be here before we know it.  So when I happened to stumble on this Shepherd's Bush Warm Heart little Miss Snowlady, I just had to stitch it in anticipation.  She's just perfect for a neutral holiday card.  Oddly, she's wearing the colors of the Washington football team.  I guess that influenced me to stitch her as well.  The photo got cropped on the right.  For once, I did manage to get the circle centered in real life.


 I think it might be time to do a little knitting.  I always get the urge around this time of year, but after I do a little bit of it, I get bored and quickly return to x-stitch.  We'll see what happens.


Friday, October 11, 2013

Farewell to Pumpkin

With great sadness in my heart, I'm writing to say goodbye to our dear blogging friend, Cathey.  The news of her passing arrived yesterday via her friend Katie.  At least her suffering is over.  My thoughts are with all of her family and friends. 

You can read more here on Katie's blog


Friday, September 27, 2013

Pumpkins for Cathey

Today is the big day to show love and support for our dear blogging buddy Cathey at the Pumpkin Patch.   This is Cathey's blogoversary so first we congratulate her for her many years of successful, entertaining blogging.  And we also want to send all the positive pumpkin energy we can as Cathey goes through difficult times.

When I first learned of this special event, the brainchild of  Sharon/DaffyCat, I immediately starting working on pumpkin stitchy projects.  Some are still in the works, but here are the finishes.  Hope they bring a little surprise cheer.

We start with a cute little girl coming out of a pumpkin to yell, "Surprise"!  This is a quilty mat/coaster from a design by  GreenBeanBaby .

Next is a cell phone case to be given in honor of Cathey to WOCS for distribution to a woman in a domestic violence shelter.  The design is the Autumn Mini-Sampler by Waxing Moon.  The x-stitch fabric is a scrap from an 18-count evenweave fabric in my stash that I really can't identify.  Plenty of pumpkin love on this one.


A slice of the October Doorways design by Vermillion Stitchery made a perfect bookmark  to welcome Halloween and show off some cute pumpkins.  This is on 36 ct Edinburgh linen with a black gros-grain ribbon fused to the back.

And finally, a finish for a design I stitched last year.  This piece is "Autumn Buddies" by Oakhaven Designs stitched on 36 ct HDF linen.  Perfect size for an Altoid top and perfect expression of pumpkin love for my "Autumn Buddy" Cathy.


Cathey, hope your day is filled with wonderful surprises!  You have tons of friends pulling for you.


Sunday, September 8, 2013

Nook Jacket & Cell Phone Case

My Nook tablet said that summer was over and cool weather is on the way so he wanted a new winter jacket.  The sleeve I made a while back is ok, but not as convenient as I would like.  Luckily, I had stitched up The Sampler Girl's "Austen/Alcott Sampler" for just this purpose.  I love that sampler and bought the pattern as soon as it was released. I did it over-one on 25 ct. Jobelan so it would fit on the cover nicely, leaving me room for a flap closure if I managed to position it correctly.   I searched through a ton of tutorials to pick one that resembled a book cover and wasn't too tricky to sew up.

The tutorial I picked is a simplified version of this Kindle Cover Tute.  I left out the pockets inside that she added for inserting boards to firm up the cover.  Some deep purple corduroy in my stash left from the old days of sewing clothes worked well for the outside body.  I pieced it with the stitching and changed the direction of the nap on each piece to add a little interest in shading.  The lining was from a Gatsby collection of modern quilting fabric.  Didn't come out perfect of course, but very usable and I'm quite happy with it.


After I made the cell phone case I posted previously, I wondered if WOCS might be interested in adding those to the type of gifts they make for people in need.  Turns out, they do make gifts for families in a domestic violence center, usually for the kids.  The center accepts donations of used cell phones to give to the women for emergency 911 dialing and they said they would love to get some cases.   I whipped up this one by adapting a design by Diane Duda of DudaDaze and stitching it with simple embroidery stitches.  The original painting is called "I Love You, Little Dog".  Diane does the most fabulous whimsical paintings and sells originals, prints and accessories like notecards featuring her work.   I love how some of her originals are done on cereal box cardboard!    


The wedding I attended over Labor Day was just marvelous.  I hadn't been to a wedding in many years and it was so much fun to go to one.  I really danced the night away too.  I thought I'd show you the cute gift wrap idea I used from a Martha Stewart tutorial.  It was really quick an easy, plus it looks a little different from the standard.  This is the "Pyramid Box" that you can find here with some additional cute ways to wrap a gift.


Saturday, August 24, 2013

Cat Treat, pocket tissue case and cards

Here's my latest square for a WOCS quilt.  This one has a cat theme and I picked out "Cat Treat" from The Trilogy since it looked so cute.  Kind of boring to stitch with large one-color blocks, but not so large over-all.  

Bonnie, one of the main quilters for WOCS recently completed her 100'th quilt for the organization!  Can you believe it?  I was very proud to have one of my squares used on that quilt, the ladybug I stitched a while ago.   Here's a photo of the quilt with my square on the left in the middle row.  Bonnie wanted to do something special for quilt 100 and I think she came up with a great idea.

In addition to quilts, WOCS members make all kinds of little accessories to give out to seniors and children in need.  Most are decorated with x-stitch designs, but  not all.  I was searching around for instructions for pocket pack tissue cases, mostly to see the finished dimensions, when I came across a super-cute version that looked easy to make.  I couldn't resist giving it a try to see if I could really make one that looked like the model.  Sure enough, this was really easy, looks like it actually has a quilt type binding even though it doesn't, fits the tissue pack and is a great way to use up fabric scraps.

Click here for the tute.


Labor Day weekend is my cousin's wedding and I made a little card to go with the wedding gift.  I had a bit of déjà vue while stitching it.  I think I stitched this design once before, but I have no photo of it and can't really remember the occasion.  Anyway, it was cute enough to stitch twice.  It didn't have suggested colors so even if this is my second stitch, it probably has a different color palette from the first.  The design is  "Basket of Flowers" from Appleseed Prim.  You can get the freebie here

Knocked out a quick birthday card to use a little later in the year.  I was searching for something else and discovered this little piece of stitching, so I thought I'd put it to good use.  This is a section of "de Tout Coeur" from Les Chalets de Perelles.  You can get the freebie here.  Hearts and champagne should go together well for a birthday celebration.

Sunday, August 4, 2013

Cellphone Case and Traveling Pattern Winner

The winner of the Lizzie Kate "Wear a Smile" pattern and, hence, the next in line to stitch the traveling pattern is Angi at My Happy Memories.  If you haven't checked out Angi's blog, take a look.  She does some lovely crafting  including free original cross-stitch designs for you to stitch.  Angi, please send me your snail mail address so I send the pattern to you.

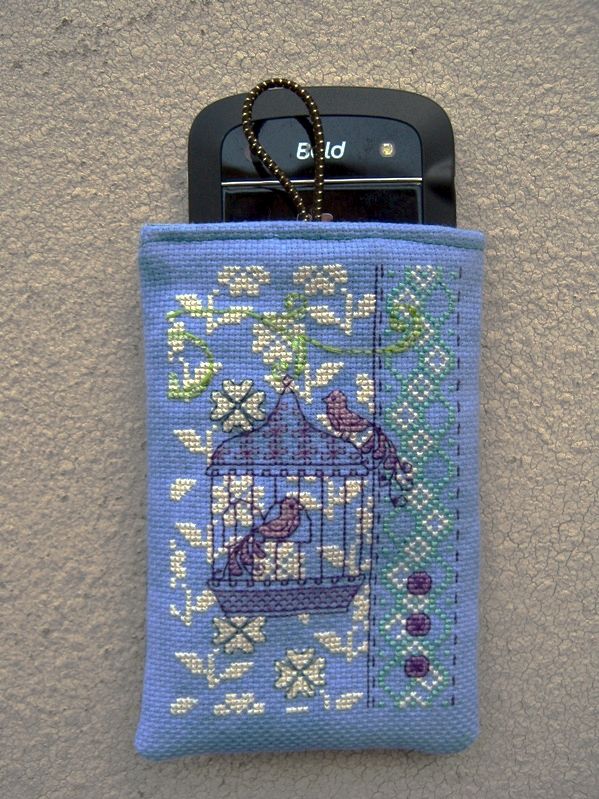
I spied these cute birdcase designs in my freebie collection while searching for something else completely.  I thought I'd make a birthday card from one of them, but after I stitched it up, I thought it was too pretty for just a card.  I had seen a tutorial with a slightly different method for sewing up a pouch from the way I usually do it and I wanted to try it out.  Plus I wanted to try a different closure.  The design was a perfect size for a cell phone pouch, so the project plans were set. 

The stitching is on 18 count hand dyed Aida from Sassy.  The floss colors have been modified since the contrast was not to my liking when I used this blue fabric with the suggested colors.   I used cotton batting and the piece is lined with no exposed raw edges.  The closure loop is made from a hair elastic, and I found a reasonably sized button in my button jar.  Makes a nice padded case for those who carry the phone and don't want it to get damaged.  Probably not ideal for those who are glued to the screen at all times.  Fits my Blackberry Bold nicely so I hope it fits whatever cell phone the recipient of this gift uses.

You can download the free patterns for the birdcage cards at the Making Spot.
The tutorial for the pouch can be found here at Elizabeth's Whimsies.


Sunday, July 28, 2013

Wear a smile, have some coffee, and think Cinderella

I think I just did the fastest complete cross stitch project of my life.   Mii Stitch chose me as the next in line to stitch Lizzie Kate's "Wear a Smile" in another of the traveling patterns that's making the rounds.  Such a cutie when I saw it, but I probably would never have thought to stitch something like this otherwise.  I received the pattern on Friday, stitched almost the whole thing on Friday night, and finished it up into a pinkeep on Saturday.  I'm planning to display it on a little easel and give it to my dentist as a little knick-knack for the office.  The office seems to thrive on such things.  It's stitched on 36 ct HDF linen over 2 threads in the 3 shades of DMC on the pattern.

I need to pick a stitcher who would like to stitch this pattern next.  Please leave a note in a comment that you would like to be included in a drawing and I'll pick a name.   As always with traveling patterns, we would like you to stitch it in a timely fashion, show it on your blog, and offer to send the pattern on to another stitcher.


Does everyone's dentist send out such arty re-call notices as mine does?  Take a look at the latest one I received:


I stitched up another Aliolka pattern to make as a gift for a coffee loving friend.  I was going to do a book mark, but then I thought about a quilty coaster.  Not 100% happy with my finish, but the more I look at it, the more I like it.  Not sure if this is on linen or evenweave.. just used an available scrap.

You can find the free chart here.


I crocheted this cute princess motif from a Japanese designer.  I think of her as Cinderella, but maybe with that hair she's more of Princess Leia.   This was a very difficult graphical crochet pattern to interpret.  I finally found a number of people who tried it on Ravelry and several gave a variation to make it work out.  So I used one of those and still had trouble.  She's not perfect, but who is?  I got the idea to make a pumpkin zippered pouch from one I had seen on the web and applique the princess on the back., So I think of it as Cinderella waiting for the pumpkin to turn into a coach so she can proceed to the ball.  Did not quite turn out the way I imagined it, but I am proud to say that I figured out how to do it with no exposed raw edges inside!     I'll probably donate her to WOCS to use as one of the favors they give to nursing home residents or even to the children in one of the shelters for domestic violence.


Tuesday, July 9, 2013

Rose Bag and Reindeer Buddy II

When you use these cross-body sling bags that I make,  surprise... they wear out eventually.   No problem.. just means I get to make more.   I had stitched this beautiful red rose from Passione Ricamo with the intention of piecing it with other fabrics and making something completely different.  But it sat for way too long waiting for a finish, so I just whipped up a romantic little bag with it.   I added a bit of crocheted lace, the first two rows of the  Celestial Edging pattern.  Then I threaded a piece of hand-dyed silk ribbon through it from a grab bag of ribbons I once bought from Vikki at HDF.  The cord is purchased.  The piece is lined with no raw edges showing inside.  I took the photos before I added a snap closure.  I have a wedding to go to later in the summer, so I think this will be perfect to use then.

The pattern is called 'A Rose For You' and you  can download it  here.
There are lots of other beautiful freebies on the page as well.


The Aliolka reindeer were just to cute to stitch only one.  Here's a companion ornament to the one I made earlier.    Another fork bow, this one with 2 loops and a bit larger.  I made it on a wide-toothed comb that I use to get the tangles out of my hair.  You can find the pattern here.   The trim on this one is actually a round spiral braid made exactly like a gimp lanyard.  This was a little thicker than my last one, but I still think I could have added another 6-strand length of floss to each of the 4 lengths used for braiding. 


Just for fun I tried a little sample of 3-strand braiding and the 4-strand round braid using 4 lengths of floss.  The 4-strand one on the bottom in the photo below is the same as the braid on the ornament, but by placing the lengths in a different order, you get a spiral effect instead of a diamond effect.

If you want to try it, here's an explanation:  Four-strand spiral braid tute 
I think I like that thickness and I'll try it out next time.  Uses a lot of floss, but floss is the cheapest supply. 

Edited July 11, 2013:  Here's a link to a You Tube video that demonstrates the four-strand braiding technique very clearly:      Four-strand spiral braid video